By the fastest and simplest method possible.
This is manual labor. It can be tedious and time consuming. Try to develop
a consistent method that works for you and is consistent with the price range
and market your art is trying to reach. If it just isn't your thing, check out our "1step easy" mats in the in-stock section. Are you using Archival Cotton Rag matboard and Archival backing or standard
paper mat and chipboard or standard foam core?If you are using cotton rag
and other archival products you should follow archival framing practices. Although
too complex to deal with here, you basically must use archival tapes/hinges
and you must insure that the print can be "unattached" without harming it. Standard matboard and backing. I am going to assume you do not want to literally glue your entire print to
the backing using mounting sprays, heat presses and/or vacuum presses. This
method does make sure your print remains wrinkle free but it can require costly
equipment, toxic sprays and it is often irreversable. We offer Self-adhesive
Foam Core on our online store that can accomplish the same thing without equipment
and sprays. The foam core has glue already applied to its face. You peel back
the cover sheet and place your print directly on the foam core. Put your mat
on top of the print and back and you have a finished presentation. The advantage
is that you do not use machinery or toxic sprays. It also holds the print uniformly
when you have images, especially photographs, that will not lay flat(static
electricity pulls the center of a photograph toward the glass or plastic bag
that holds the matted piece). This is quite noticeable in glossy photographs.
The major disadvantage is that it can take a lot of work to remove the print
from the backing. It you are not planning on removing the print, this method
provides a nice flat mounting. Assuming you are not going to use the method above, the first rule of mounting
is: Do not attach the print on all four corners. "Hang it" from the top
edge. Since prints are paper and are normally attached to paper, changing moisture
content can make the individual pieces "grow" or "contract". This will cause
your print to warp. That is why frames are normally cut somewhat larger than
the matboard. Matboard that is too tight in the frame can buckle when it expands
and pushes against the edges of the frame. Decide if you are attaching the print to the mat or the back. Both
methods have their supporters. I find attaching the print to the back of the mat awkward. However, it does
allow you to "hold it in place" in the mat window. Also, you can probably avoid
attaching the backing(Foam Core or Chipboard) to the mats if you are putting
the print in a frame or clear plastic bag. Attaching the print to the mat does
have the advantage that the tape is attached to the back of the print and not
on the face of the print. Therefore, any damage caused to the print by removing
the tape is limited to the back. Because matboard with a window cut out of it
is not as strong as backing, this method is less desirable for large prints. Simply attach a piece(s) of tape(our 1" Framer's Tape works well) to the
top edge of the back of your print so the tape extends above your print. Place
your print on a table and allign the mat over it. Put the mat on the print and
apply pressure to the top of the mat in the general area of the tape. There are four basic methods of attaching images to the backing instead. One, put your print on the backing. Position the print so it will line up
in the mat window. Attach a piece or couple pieces of tape(like our 1" acid
free Framer's Tape) to the top edge of the front of the print in such a way
that the tape extends above the print. Since most of you are doing multiple
pieces of the same size, allignment can be easily achieved by using one mat
as a template and simply drawing the window on the backing. Use a pencil not
a pen-ink can leach into the paper materials and image. This method is fast
but it has the disadvantage that the tape is attached to the front of the print.
This makes it difficult to remove the tape without damaging the print. The manufacturer of our Framer's Tape does, however, claim it can be removed quite easily if you apply heat. However, make sure your print is not sensitive to heat. An alternative to placing the tape on the face of the print is to use our ATG
tape(available on online store). This is basically double sided tape. Place
the ATG tape on the back of the print at the top edge or on the backing where
the print edge will be placed, remove the carrier material (automatic if using
the ATG gun) and place the print in position and press down on the backing.
This method is very fast. The disadvantage is that it is difficult to get the
tape off the back of the print if you want to remove it. Great for small inexpensive
prints and for fast production. Not for use with valuable prints you may someday
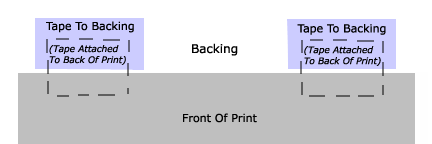
want to reframe. The second method of attaching a print to the backing is to make hinges. In
this case, you attach two small pieces of tape (more if the print is quite large)
to the back of the print facing up as you would if you are attaching the print
to the mat. Position the print on the back so it is centered in the mat window.
Then place additional "strips" of tape face down over the tape that
is already attached to the back of the print. In this manner the tape is actually
taped to the back. The print is "hinged" in position. The advantage
is that the tape is not on the front of the image. In addition, the image and
be reframed or repositioned by cutting the tape that holds the hinge to the
back instead of having to remove the tape attached to the back of the print
and causing damage.
The third method is to use acid-free plastic corners or strips. These relatively
new products have adhesive already applied to them. The corners are similar
to traditional "photo corners" in old albums. The strips are short
pieces of plastic that can be placed around the print at positions other than
the corners. The advantage is that they are easy to apply and are not directly
attached to the image. Therefore, there is no problem removing the print for
reframing. The strips help alleviate the problem of using the corners on larger
prints which need more support than four corners provide. The corner and strips
are available through our online store.


